
Getting Started Creating User Interfaces
This article will help you get started creating interfaces in SplashKit. In this one we'll see how to create and use basic elements, like buttons and sliders. In later the next ones, we'll move on to advanced layouting, and finally we'll see how we can style the interface to match our project. Written by Sean Boettger and others on October 2024
In this article we’ll see how to create user interfaces in SplashKit. This’ll let you add buttons, sliders, text boxes, and other elements to your games/programs. This is a great way to add interactivity, and also to visualise your variables!
Part 1: Basic element creation
Section titled “Part 1: Basic element creation”Let’s see how we can create a simple button. We’ll start in an empty project, and focus on just showing the button. Then we’ll make it interactive.
-
Let’s begin by setting up our main function and opening up a window for us to place our interface elements on. See Drawing using Procedures if you aren’t familiar with this part. In this example code, we’ve:
- opened up a window
- cleared the screen white
- refreshed the screen so we can see what’s on it
- and finally delayed for 5 seconds (so the program doesn’t end immediately)
Make sure to have a look at the code, and see where we’ll put our interface code!
#include "splashkit.h"int main(){// open a window and clear it to whiteopen_window("My Interface!", 800, 600);clear_screen(COLOR_WHITE);// ...we'll put our interface code here!...// refresh the screen, then wait 5 secondsrefresh_screen();delay(5000);// close all open windowsclose_all_windows();return 0;}using static SplashKitSDK.SplashKit;// open a window and clear it to whiteOpenWindow("My Interface!", 800, 600);ClearScreen(ColorWhite());// ...we'll put our interface code here!...// refresh the screen, then wait for 5 secondsRefreshScreen();Delay(5000);// close all open windowsCloseAllWindows();using SplashKitSDK;namespace CreatingUserInterfaces{public class Program{public static void Main(){// open a window and clear it to whiteWindow window = new Window("My Interface!", 800, 600);window.Clear(Color.White);// ...we'll put our interface code here!...// refresh the screen, then wait for 5 secondswindow.Refresh();SplashKit.Delay(5000);// close all open windowsSplashKit.CloseAllWindows();}}}from splashkit import *# open a window and clear it to whiteopen_window("My Interface!", 800, 600)clear_screen_to_white()# ... we'll put our interface code here!...# refresh the screen, then wait 5 secondsrefresh_screen()delay(5000)# close all open windowsclose_all_windows() -
Now let’s show a button! This can be done with the Button function, which takes some text to show on the button, and also a position and size so it knows where to show up.
For example in C++,
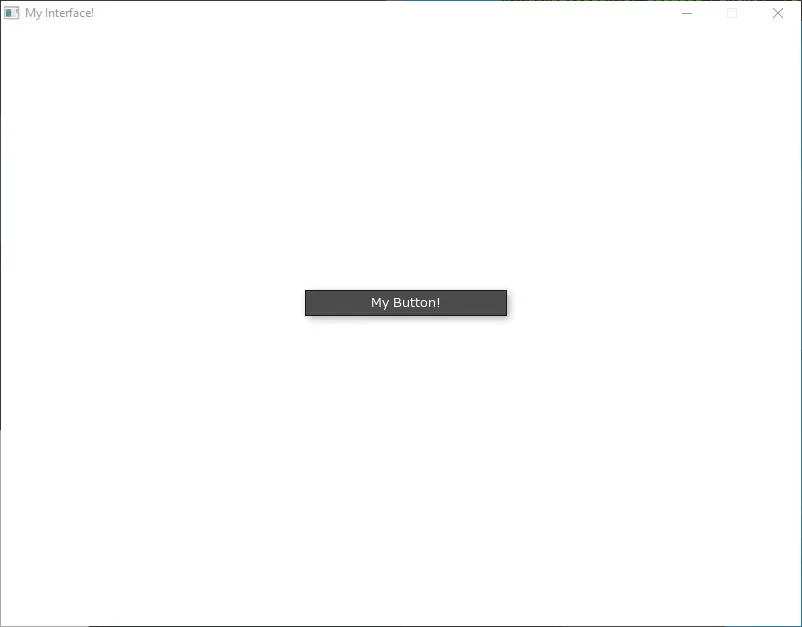
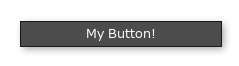
button("My Button!", rectangle_from(300, 260, 200, 24));will show a button in the middle of the screen, with the label “My Button!”. -
We also need to draw the interface - we can do this with Draw Interface
Making those changes, we get the following:
#include "splashkit.h"int main(){// open a window and clear it to whiteopen_window("My Interface!", 800, 600);clear_screen(COLOR_WHITE);// show buttonbutton("My Button!", rectangle_from(300, 260, 200, 24));// draw the interface!draw_interface();// refresh the screen, then wait 5 secondsrefresh_screen();delay(5000);// close all open windowsclose_all_windows();return 0;}using static SplashKitSDK.SplashKit;// open a window and clear it to whiteOpenWindow("My Interface!", 800, 600);ClearScreen(ColorWhite());// show buttonButton("My Button!", RectangleFrom(300, 260, 200, 24));// draw the interface!DrawInterface();// refresh the screen, then wait 5 secondsRefreshScreen();Delay(5000);// close all open windowsCloseAllWindows();using SplashKitSDK;namespace CreatingUserInterfaces{public class Program{public static void Main(){// open a window and clear it to whiteWindow window = new Window("My Interface!", 800, 600);window.Clear(Color.White);// show buttonSplashKit.Button("My Button!", SplashKit.RectangleFrom(300, 260, 200, 24));// draw the interface!SplashKit.DrawInterface();// refresh the screen, then wait 5 secondswindow.Refresh();SplashKit.Delay(5000);// close all open windowsSplashKit.CloseAllWindows();}}}# open a window and clear it to whiteopen_window("My Interface!", 800, 600)clear_screen_to_white()# show buttonbutton_at_position("My Button!", rectangle_from(300, 260, 200, 24))# draw the interface!draw_interface()# refresh the screen, then wait 5 secondsrefresh_screen()delay(5000)# close all open windowsclose_all_windows()Which if you run, will show you this!
But you’ll notice that you can’t click the button yet! Don’t worry, to get this working we just need to make sure we process the user’s events (like clicks and keyboard presses).
To do this, we need to add a loop - this will make our code run over and over again (rather than just waiting 5 seconds then exiting like it does now). Then inside that loop we’ll check for user input!
-
Start by deleting the Delay (
delay(5000)) line, since this was just so the window didn’t vanish immediately. -
Then we can add a
whileloop, that loops as long as the user hasn’t tried to close the window (using Quit Requested). This loop will need to enclose basically everything, from clearing the screen, down to refreshing it. That way we can keep updating the screen and drawing our button to it over and over! -
Then well add a statement inside the
whileloop at the top, to check for user input using Process Events. You may have also noticed a warning in the terminal about this:
WARNING -> Interface function called before 'process_events' - make sure to call this first!SplashKit will try to give helpful messages when things aren’t quite right, so make sure to pay attention to them!
Putting this all together, we get this:
#include "splashkit.h"int main(){// open a windowopen_window("My Interface!", 800, 600);while (!quit_requested()){process_events();clear_screen(COLOR_WHITE);button("My Button!", rectangle_from(300, 260, 200, 24));draw_interface();refresh_screen();}// close all open windowsclose_all_windows();return 0;}using static SplashKitSDK.SplashKit;// open a windowOpenWindow("My Interface!", 800, 600);while (!QuitRequested()){ProcessEvents();ClearScreen(ColorWhite());Button("My Button!", RectangleFrom(300, 260, 200, 24));DrawInterface();RefreshScreen();}// close all open windowsCloseAllWindows();using SplashKitSDK;namespace CreatingUserInterfaces{public class Program{public static void Main(){// open a windowWindow window = new Window("My Interface!", 800, 600);while (!window.CloseRequested){SplashKit.ProcessEvents();window.Clear(Color.White);SplashKit.Button("My Button!", SplashKit.RectangleFrom(300, 260, 200, 24));SplashKit.DrawInterface();window.Refresh();}// close all open windowsSplashKit.CloseAllWindows();}}}# open a windowopen_window("My Interface!", 800, 600)while (not quit_requested()):process_events()clear_screen_to_white()button_at_position("My Button!", rectangle_from(300, 260, 200, 24))draw_interface()refresh_screen()# close all open windowsclose_all_windows()And we can now click the button!
You’ll notice something interesting here - we put the call to Button inside the loop! This is because SplashKit uses what’s called an ‘immediate mode’ UI paradigm.
This means that when we make a Button, or any other element, it does its job of ‘checking if its clicked’ once, and then stops existing. This means we need to keep calling Button every iteration of our loop, just like we call Process Events every iteration.
This makes it really easy to make dynamic user interfaces, since you can change them every iteration! This might be different to other UI frameworks you have used or will use, so just make sure to keep this in mind.
-
Part 2: Responding to events
Section titled “Part 2: Responding to events”Alright, now we can hover over and click the button! But it doesn’t do anything yet - how do we check if it’s been pressed?
All the UI elements in SplashKit return their results. For instance, Button returns a boolean - true if it has been clicked, and false if not!
Let’s try it out:
- We can put the call to Button inside an if statement.
- Then, in the if statement’s body let’s just make it print some text to the terminal, using Write Line
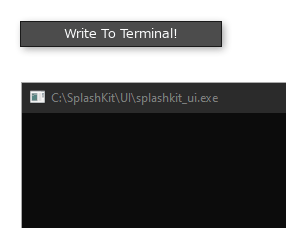
We should also give the button some more descriptive text inside it, like “Write To Terminal!”
if (button("Write To Terminal!", rectangle_from(300, 260, 200, 24))) { write_line("The button was clicked!"); }if (Button("Write To Terminal!", RectangleFrom(300, 260, 200, 24))){ WriteLine("The button was clicked!");} if (SplashKit.Button("Write To Terminal!", SplashKit.RectangleFrom(300, 260, 200, 24))) { SplashKit.WriteLine("The button was clicked!"); }if button_at_position("Write To Terminal!", rectangle_from(300, 260, 200, 24)): write_line("The button was clicked!")Note how rather than creating the button, and then checking if it’s been clicked seperately, we’ve used a single call to Button, that both shows the button and returns whether its been clicked.
Now when we click on the button, our text gets printed in the terminal! You can of course put whatever code you want - for instance, the button could start your game, add an item to your stock program, or pop up extra info.
Part 3: More elements
Section titled “Part 3: More elements”Now let’s try out some more interesting elements - let’s add a text box, so we can customize the message written to the terminal!
-
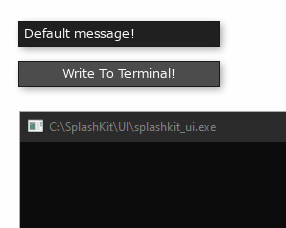
First let’s start by adding a variable to store the user’s text in - make sure to do this outside the main loop, or else the user’s text will be forgotten each iteration!
open_window("My Interface!", 800, 600);string user_message = "Default message!";while (!quit_requested()){process_events();OpenWindow("My Interface!", 800, 600);string userMessage = "Default message!";while (!QuitRequested()){ProcessEvents();Window window = new Window("My Interface!", 800, 600);string userMessage = "Default message!";while (!window.CloseRequested){SplashKit.ProcessEvents();open_window("My Interface!", 800, 600)user_message = "Default message!"while (not quit_requested()):process_events() -
Now let’s add the text box. We can use the Text Box function, which takes a string - the current text, and a position - where to draw it.
It then returns the updated text - if the user hasn’t typed anything, this will be the same text that was passed in. But if the user has typed something, this will be our new text, and we can store it in the variable!
For example,
user_text = text_box(user_text, rectangle_from(0,0,200,24));would show a text box at the top-right corner of the screen, with the text that’s in the variableuser_text, and if the user has altered the text, it would return the new text and store it back intouser_text.Finally, we can use this variable in our Write Line, to write the user’s text to the console.
Remember - this all needs to go inside the main
whileloop. Otherwise the text box will only exist for a split second before vanishing - we need to keep it alive!user_message = text_box(user_message, rectangle_from(300, 220, 200, 24));if (button("Write To Terminal!", rectangle_from(300, 260, 200, 24))){write_line(user_message);}userMessage = TextBox(userMessage, RectangleFrom(300, 220, 200, 24));if (Button("Write To Terminal!", RectangleFrom(300, 260, 200, 24))){WriteLine(userMessage);}userMessage = SplashKit.TextBox(userMessage, SplashKit.RectangleFrom(300, 220, 200, 24));// Check if the button is clickedif (SplashKit.Button("Write To Terminal!", SplashKit.RectangleFrom(300, 260, 200, 24))){SplashKit.WriteLine(userMessage);}user_message = text_box_at_position(user_message, rectangle_from(300, 220, 200, 24))if button_at_position("Write To Terminal!", rectangle_from(300, 260, 200, 24)):write_line(user_message)See how
user_messagegets passed in to the Text Box, and then that value flows back out as the return, and gets assigned back touser_message. This is how all the other element functions, like Slider, and Number Box work too!And that’s it! In two lines of code we added our text box as well - this is what it will look like now:
Here’s the complete code up until this point:
#include "splashkit.h"
int main(){    // open a window    open_window("My Interface!", 800, 600);
    // define variables    string user_message = "Default message!";
    // main loop    while (!quit_requested())    {        // get user events        process_events();
        // clear screen        clear_screen(COLOR_WHITE);
        // interface!        user_message = text_box(user_message, rectangle_from(300, 220, 200, 24));
        if (button("Write To Terminal!", rectangle_from(300, 260, 200, 24)))        {            write_line(user_message);        }
        // finally draw interface, then refresh screen        draw_interface();
        refresh_screen();    }
    // close all open windows    close_all_windows();
return 0;}using static SplashKitSDK.SplashKit;
// open a windowOpenWindow("My Interface!", 800, 600);
// define variablesstring userMessage = "Default message!";
// main loopwhile (!QuitRequested()){ // get user events ProcessEvents();
// clear screen ClearScreen(ColorWhite());
// interface! userMessage = TextBox(userMessage, RectangleFrom(300, 220, 200, 24));
if (Button("Write To Terminal!", RectangleFrom(300, 260, 200, 24))) { WriteLine(userMessage); }
// finally draw interface, then refresh screen DrawInterface(); RefreshScreen();}
// close all open windowsCloseAllWindows();using SplashKitSDK;
namespace CreatingUserInterfaces{ public class Program { public static void Main() { // open a window Window window = new Window("My Interface!", 800, 600);
// define variables string userMessage = "Default message!";
// main loop while (!window.CloseRequested) { // get user events SplashKit.ProcessEvents();
// clear screen window.Clear(Color.White);
// interface! userMessage = SplashKit.TextBox(userMessage, SplashKit.RectangleFrom(300, 220, 200, 24));
if (SplashKit.Button("Write To Terminal!", SplashKit.RectangleFrom(300, 260, 200, 24))) { SplashKit.WriteLine(userMessage); }
// finally draw interface, then refresh screen SplashKit.DrawInterface(); window.Refresh(); }
// close all open windows SplashKit.CloseAllWindows(); } }}from splashkit import *
# open a windowopen_window("My Interface!", 800, 600)
# define variablesuser_message = "Default message!"
# main loopwhile (not quit_requested()): # get user events process_events()
# clear screen clear_screen_to_white()
# interface! user_message = text_box_at_position(user_message, rectangle_from(300, 220, 200, 24))
if button_at_position("Write To Terminal!", rectangle_from(300, 260, 200, 24)): write_line(user_message)
# finally draw interface, then refresh screen draw_interface() refresh_screen()
# close all open windowsclose_all_windows()Practice Activity
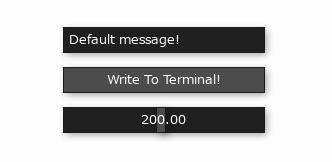
Section titled “Practice Activity”Let’s try adding one more element - this time we can try adding a slider! For fun, let’s try making the slider change the width of the elements themselves.
- Just like before, we need to add a new variable outside the loop, to hold the current width. We can make it a
float, call itwidth, and give it an initial value of 200. - Now we’ll need to make the slider inside the
whileloop! To do this we can use the function Slider, which takes the current value, then a minimum value, a maximum value, and finally the position. For example,slider(current_value, 0, 100, rectangle_from(300, 300, 200, 24)), will create a slider with the range 0 to 100, in the middle of the screen. It’ll show the valuecurrent_value, and return the final value (including if the user changed it). - To make the elements actually change width, we just need to update the calls to Rectangle From, changing the width to our variable
widthinstead! You can also try centering the elements, by adjusting their x coordinate as well.
Here is one way to write this, but don’t peek until you’ve tried it yourself!
#include "splashkit.h"
int main(){    // open a window    open_window("My Interface!", 800, 600);
    // define variables    string user_message = "Default message!";    float width = 200;
    // main loop    while (!quit_requested())    {        // get user events        process_events();
        // clear screen        clear_screen(COLOR_WHITE);
        // interface!        user_message = text_box(user_message, rectangle_from(400 - width/2, 220, width, 24));
        if (button("Write To Terminal!", rectangle_from(400 - width/2, 260, width, 24)))        {            write_line(user_message);        }
        width = slider(width, 10, 400, rectangle_from(300, 300, 200, 24));
        // finally draw interface, then refresh screen        draw_interface();        refresh_screen();    }
    // close all open windows    close_all_windows();
return 0;}using static SplashKitSDK.SplashKit;
// open a windowOpenWindow("My Interface!", 800, 600);
// define variablesstring userMessage = "Default message!";float width = 200;
// main loopwhile (!QuitRequested()){ // get user events ProcessEvents();
// clear screen ClearScreen(ColorWhite());
// interface! userMessage = TextBox(userMessage, RectangleFrom(400 - width/2, 220, width, 24));
if (Button("Write To Terminal!", RectangleFrom(400 - width/2, 260, width, 24))) { WriteLine(userMessage); }
width = Slider(width, 10, 400, RectangleFrom(300, 300, 200, 24));
// finally draw interface, then refresh screen DrawInterface(); RefreshScreen();}
// close all open windowsCloseAllWindows();using SplashKitSDK;
namespace CreatingUserInterfaces{ public class Program { public static void Main() { // open a window Window window = new Window("My Interface!", 800, 600);
// define variables string userMessage = "Default message!"; float width = 200;
// main loop while (!window.CloseRequested) { // get user events SplashKit.ProcessEvents();
// clear screen window.Clear(Color.White);
// interface! userMessage = SplashKit.TextBox(userMessage, SplashKit.RectangleFrom(400 - width / 2, 220, width, 24));
if (SplashKit.Button("Write To Terminal!", SplashKit.RectangleFrom(400 - width / 2, 260, width, 24))) { SplashKit.WriteLine(userMessage); }
width = SplashKit.Slider(width, 10, 400, SplashKit.RectangleFrom(300, 300, 200, 24));
// finally draw interface, then refresh screen SplashKit.DrawInterface(); window.Refresh(); }
// close all open windows SplashKit.CloseAllWindows(); } }}from splashkit import *
# open a windowopen_window("My Interface!", 800, 600)
# define variablesuser_message = "Default message!"width = 200
# main loopwhile (not quit_requested()): # get user events process_events()
# clear screen clear_screen_to_white()
# interface user_message = text_box_at_position(user_message, rectangle_from(400 - width/2, 220, width, 24))
if button_at_position("Write To Terminal!", rectangle_from(400 - width/2, 260, width, 24)): write_line(user_message)
width = slider_at_position(width, 10, 400, rectangle_from(300, 300, 200, 24))
# finally draw interface, then refresh screen draw_interface() refresh_screen()
# close all open windowsclose_all_windows()Wrap up
Section titled “Wrap up”If we put together all the code so far, we get this complete example here!
Hopefully now you understand how easy it is to make a dynamic interface in SplashKit!
#include "splashkit.h"
int main(){    // open a window    open_window("My Interface!", 800, 600);
    // define variables    string user_message = "Default message!";    float width = 200;
    // main loop    while (!quit_requested())    {        // get user events        process_events();
        // clear screen        clear_screen(COLOR_WHITE);
        // interface!        user_message = text_box(user_message, rectangle_from(400 - width/2, 220, width, 24));
        if (button("Write To Terminal!", rectangle_from(400 - width/2, 260, width, 24)))        {            write_line(user_message);        }
        width = slider(width, 10, 400, rectangle_from(300, 300, 200, 24));
        // finally draw interface, then refresh screen        draw_interface();        refresh_screen();    }
    // close all open windows    close_all_windows();
return 0;}using static SplashKitSDK.SplashKit;
// open a windowOpenWindow("My Interface!", 800, 600);
// define variablesstring userMessage = "Default message!";float width = 200;
// main loopwhile (!QuitRequested()){ // get user events ProcessEvents();
// clear screen ClearScreen(ColorWhite());
// interface! userMessage = TextBox(userMessage, RectangleFrom(400 - width/2, 220, width, 24));
if (Button("Write To Terminal!", RectangleFrom(400 - width/2, 260, width, 24))) { WriteLine(userMessage); }
width = Slider(width, 10, 400, RectangleFrom(300, 300, 200, 24));
// finally draw interface, then refresh screen DrawInterface(); RefreshScreen();}
// close all open windowsCloseAllWindows();using SplashKitSDK;
namespace CreatingUserInterfaces{ public class Program { public static void Main() { // open a window Window window = new Window("My Interface!", 800, 600);
// define variables string userMessage = "Default message!"; float width = 200;
// main loop while (!window.CloseRequested) { // get user events SplashKit.ProcessEvents();
// clear screen window.Clear(Color.White);
// interface! userMessage = SplashKit.TextBox(userMessage, SplashKit.RectangleFrom(400 - width / 2, 220, width, 24));
if (SplashKit.Button("Write To Terminal!", SplashKit.RectangleFrom(400 - width / 2, 260, width, 24))) { SplashKit.WriteLine(userMessage); }
width = SplashKit.Slider(width, 10, 400, SplashKit.RectangleFrom(300, 300, 200, 24));
// finally draw interface, then refresh screen SplashKit.DrawInterface(); window.Refresh(); }
// close all open windows SplashKit.CloseAllWindows(); } }}from splashkit import *
# open a windowopen_window("My Interface!", 800, 600)
# define variablesuser_message = "Default message!"width = 200
# main loopwhile (not quit_requested()): # get user events process_events()
# clear screen clear_screen_to_white()
# interface user_message = text_box_at_position(user_message, rectangle_from(400 - width/2, 220, width, 24))
if button_at_position("Write To Terminal!", rectangle_from(400 - width/2, 260, width, 24)): write_line(user_message)
width = slider_at_position(width, 10, 400, rectangle_from(300, 300, 200, 24))
# finally draw interface, then refresh screen draw_interface() refresh_screen()
# close all open windowsclose_all_windows()