
Layouts in User Interfaces
This article will help you understand how to customize the layouts of your interfaces in SplashKit. Written by Sean Boettger and others on October 2024
In this article we’ll see how we can create layouts for our SplashKit interfaces! This will allow us to automatically position our UI elements in rows and columns, hide them under drop downs, and place them on draggable panels, which will help us create really detailed and dynamic interfaces.
The last few sections of this article will be closer to an API reference than the previous one - rather than complete examples, there will be mostly snippets of code you can try out to explore each concept!
Part 1: Creating panels
Section titled “Part 1: Creating panels”All the automatic layouting functionality in SplashKit starts by creating a container, and the most useful container is a ‘panel’. A panel is like a mini window inside your program, that can be dragged around and resized. We’ll be placing our elements inside these panels.
Here’s just a basic example from the previous tutorial that we can get started from:
#include "splashkit.h"
int main(){    // open a window    open_window("My Interface!", 800, 600);
    // main loop    while (!quit_requested())    {        // get user events        process_events();
        // clear screen        clear_screen(COLOR_WHITE);
        // ...we'll put our interface code here...!
        // finally draw interface, then refresh screen        draw_interface();        refresh_screen();    }
    // close all open windows    close_all_windows();
return 0;}using static SplashKitSDK.SplashKit;
// open a windowOpenWindow("My Interface!", 800, 600);
// main loopwhile (!QuitRequested()){ // get user events ProcessEvents();
// clear screen ClearScreen(ColorWhite());
// ...we'll put our interface code here...!
// finally draw interface, then refresh screen DrawInterface(); RefreshScreen();}
// close all open windowsCloseAllWindows();using SplashKitSDK;
namespace InterfaceLayouts{ public class Program { public static void Main() { // open a window Window window = new Window("My Interface!", 800, 600);
// main loop while (!window.CloseRequested) { // get user events SplashKit.ProcessEvents();
// clear screen window.Clear(Color.White);
// ...we'll put our interface code here...!
// finally draw interface, then refresh screen SplashKit.DrawInterface(); window.Refresh(); }
// close all open windows SplashKit.CloseAllWindows(); } }}from splashkit import *
# open a windowopen_window("My Interface!", 800, 600)
# main loopwhile (not quit_requested()): # get user events process_events()
# clear screen clear_screen_to_white()
# ...we'll put our interface code here...!
# finally draw interface, then refresh screen draw_interface()
refresh_screen()
# close all open windowsclose_all_windows()Let’s add a panel now! Adding a panel takes two lines of code:
-
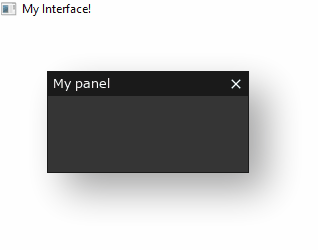
First we begin the panel with Start Panel, which takes a name for the panel, and a rectangle for its initial position. For example
start_panel("My panel", rectangle_from(50,50,200,100))creates a panel with the title “My panel”, that appears close to the top-left corner (50,50), and a width and height of 200 by 100.After this we can place all the UI elements that should go on the panel, just like we were!
-
Then once we’re done, we need to end the panel with End Panel, where we just give it the same name (so for example
end_panel("My panel")).
One really important thing to note here is that Start Panel returns whether the panel is visible or not, so we need to make sure to check this as well, and only create elements and end the panel if the panel is open, like so:
// start the panel and check if it's open/visibleif (start_panel("My panel", rectangle_from(50,50,200,100))){    // ...here we'll create all the UI elements, inside the braces { ... }
// end the panel end_panel("My panel");}// start the panel and check if it's open/visibleif (StartPanel("My panel", RectangleFrom(50, 50, 200, 100))){ // ...here we'll create all the UI elements, inside the braces { ... }
// end the panel EndPanel("My panel");}// start the panel and check if it's open/visibleif (SplashKit.StartPanel("My panel", SplashKit.RectangleFrom(50, 50, 200, 100))){ // ...here we'll create all the UI elements, inside the braces { ... }
// end the panel SplashKit.EndPanel("My panel");}# start the panel and check if it's open/visibleif (start_panel("My panel", rectangle_from(50,50,200,100))): # ...here we'll create all the UI elements
# end the panel end_panel("My panel")Just testing the code above will give us this! We can already drag around and resize the panel, so let’s start adding elements!
Part 2: Adding UI elements
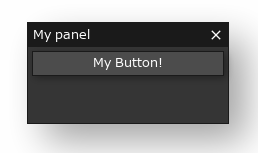
Section titled “Part 2: Adding UI elements”Adding elements is very similar to what we were doing last tutorial - we just don’t need to specify the position anymore! For example previously we added a button with button("My Button!", rectangle_from(300, 260, 200, 24)) - now we can just use button("My Button!")!
This’ll give us a button like this:
Similarly, we can add a Text Box by declaring a string variable outside the main loop, and then calling my_string = text_box(my_string):
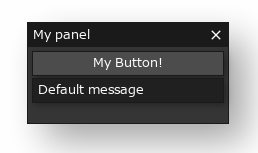
Here’s the full code recreating what we had last tutorial, while creating a panel and adding the elements inside it.
#include "splashkit.h"
int main(){    // open a window    open_window("My Interface!", 800, 600);
    // setup a variable to store the user's string - same as last tutorial    string user_message = "Default message";
    // main loop    while (!quit_requested())    {        // get user events        process_events();
        // clear screen        clear_screen(COLOR_WHITE);
        // here we start the panel        if (start_panel("My panel", rectangle_from(50,50,200,100)))        {            // create the elements, just like last tutorial!            if (button("Write To Terminal!"))            {                write_line(user_message);            }
            user_message = text_box(user_message);
            // end the panel            end_panel("My panel");        }
        // finally draw interface, then refresh screen        draw_interface();        refresh_screen();    }
    // close all open windows    close_all_windows();
return 0;}using static SplashKitSDK.SplashKit;
// open a windowOpenWindow("My Interface!", 800, 600);
// setup a variable to store the user's string - same as last tutorialstring userMessage = "Default message";
// main loopwhile (!QuitRequested()){ // get user events ProcessEvents();
// clear screen ClearScreen(ColorWhite());
// here we start the panel if (StartPanel("My panel", RectangleFrom(50, 50, 200, 100))) { // create the elements, just like last tutorial! if (Button("Write To Terminal!")) { WriteLine(userMessage); }
userMessage = TextBox(userMessage);
// end the panel EndPanel("My panel"); }
// finally draw interface, then refresh screen DrawInterface(); RefreshScreen();}
// close all open windowsCloseAllWindows();using SplashKitSDK;
namespace InterfaceLayouts{ public class Program { public static void Main() { // open a window Window window = new Window("My Interface!", 800, 600);
// setup a variable to store the user's string - same as last tutorial string userMessage = "Default message";
// main loop while (!window.CloseRequested) { // get user events SplashKit.ProcessEvents();
// clear screen window.Clear(Color.White);
// here we start the panel if (SplashKit.StartPanel("My panel", SplashKit.RectangleFrom(50, 50, 200, 100))) { // create the elements, just like last tutorial! if (SplashKit.Button("Write To Terminal!")) { SplashKit.WriteLine(userMessage); }
userMessage = SplashKit.TextBox(userMessage);
// end the panel SplashKit.EndPanel("My panel"); }
// finally draw interface, then refresh screen SplashKit.DrawInterface(); window.Refresh(); }
// close all open windows SplashKit.CloseAllWindows(); } }}from splashkit import *
# open a windowopen_window("My Interface!", 800, 600)
# setup a variable to store the user's string - same as last tutorialuser_message = "Default message!"
# main loopwhile (not quit_requested()): # get user events process_events()
# clear screen clear_screen_to_white()
# here we start the panel if (start_panel("My panel", rectangle_from(50,50,200,100))): # create the elements, just like last tutorial! if button("Write To Terminal!"): write_line(user_message)
user_message = text_box(user_message)
# end the panel end_panel("My panel")
# finally draw interface, then refresh screen draw_interface() refresh_screen()
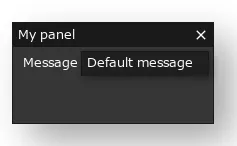
# close all open windowsclose_all_windows()Another useful thing you can do now is add labels to your elements. You can do this by passing an additional string to each element function at the start - as an example, text_box(my_string) can become text_box("Message", my_string), which will give us this:
Part 3: Layout elements (Reference)
Section titled “Part 3: Layout elements (Reference)”Now that we can create panels and place UI elements on those panels, let’s see how we can use extra elements to help lay them out!
This section will focus on mainly demonstrating each concept.
Make sure to try each of these snippets out - you can just copy paste them into anywhere between your start/end panel calls.
Some of the easiest ways to group our elements together, is to place them under headers and inside ‘insets’.
Headers
Section titled “Headers”Headers are really easy to add - we can use the Header function, which takes a name for the heading, and returns if the header is open (like the panels!):
if (header("Edit Message!")){ user_message = text_box(user_message);}if (Header("Edit Message!")){ userMessage = TextBox(userMessage);}if (SplashKit.Header("Edit Message!")){ userMessage = SplashKit.TextBox(userMessage);}if header("Edit Message!"): user_message = text_box(user_message)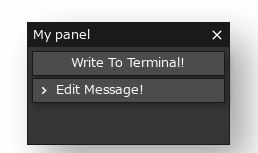
Note: headers do not need to be began/ended, so they’re nice and easy to use!
Insets
Section titled “Insets”Insets let you group a bunch of elements inside a fixed-size region! They can be created using Start Inset, which takes a name, and a height. After creating your elements, you can then call End Inset with the same name to finish it.
Here’s a code example - an inset is started, and six buttons are created inside it. Finally, the inset is ended.
paragraph("This text is outside the inset area!");start_inset("Inset area", 60);
if (button("Button 1!"))    write_line("Button 1 clicked!");if (button("Button 2!"))    write_line("Button 2 clicked!");if (button("Button 3!"))    write_line("Button 3 clicked!");if (button("Button 4!"))    write_line("Button 4 clicked!");if (button("Button 5!"))    write_line("Button 5 clicked!");if (button("Button 6!"))    write_line("Button 6 clicked!");
end_inset("Inset area");Paragraph("This text is outside the inset area!");StartInset("Inset area", 60);
if (Button("Button 1!")) WriteLine("Button 1 clicked!");if (Button("Button 2!")) WriteLine("Button 2 clicked!");if (Button("Button 3!")) WriteLine("Button 3 clicked!");if (Button("Button 4!")) WriteLine("Button 4 clicked!");if (Button("Button 5!")) WriteLine("Button 5 clicked!");if (Button("Button 6!")) WriteLine("Button 6 clicked!");
EndInset("Inset area");SplashKit.Paragraph("This text is outside the inset area!");SplashKit.StartInset("Inset area", 60);
if (SplashKit.Button("Button 1!")) SplashKit.WriteLine("Button 1 clicked!");if (SplashKit.Button("Button 2!")) SplashKit.WriteLine("Button 2 clicked!");if (SplashKit.Button("Button 3!")) SplashKit.WriteLine("Button 3 clicked!");if (SplashKit.Button("Button 4!")) SplashKit.WriteLine("Button 4 clicked!");if (SplashKit.Button("Button 5!")) SplashKit.WriteLine("Button 5 clicked!");if (SplashKit.Button("Button 6!")) SplashKit.WriteLine("Button 6 clicked!");
SplashKit.EndInset("Inset area");paragraph("This text is outside the inset area!")start_inset("Inset area", 60)
if (button("Button 1!")): write_line("Button 1 clicked!")if (button("Button 2!")): write_line("Button 2 clicked!")if (button("Button 3!")): write_line("Button 3 clicked!")if (button("Button 4!")): write_line("Button 4 clicked!")if (button("Button 5!")): write_line("Button 5 clicked!")if (button("Button 6!")): write_line("Button 6 clicked!")
end_inset("Inset area")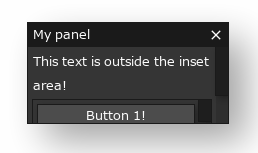
Another powerful feature of insets, is that you can use them as a container directly on the main window too!
Tree nodes
Section titled “Tree nodes”Tree nodes allow you to organize your elements as a tree - like a file system! You can collapse and expand the nodes individually, so this is a great way to organize data.
Here’s a code example - various nested tree nodes are started and ended with, buttons placed in between - this creates a hierarchy.
if (start_treenode("Some buttons!")){    if (button("Button 1!"))        write_line("Button 1 clicked!");    if (button("Button 2!"))        write_line("Button 2 clicked!");    if (button("Button 3!"))        write_line("Button 3 clicked!");    end_treenode("Some buttons!");}
if (start_treenode("Some more buttons!")){    if (button("Button 4!"))        write_line("Button 4 clicked!");    if (button("Button 5!"))        write_line("Button 5 clicked!");
      if (start_treenode("Buttons in buttons!!")){          if (button("Button 6!")) write_line("Button 6 clicked!");
          end_treenode("Buttons in buttons!!");      }
end_treenode("Some more buttons!"); }if (StartTreenode("Some buttons!")){ if (Button("Button 1!")) WriteLine("Button 1 clicked!"); if (Button("Button 2!")) WriteLine("Button 2 clicked!"); if (Button("Button 3!")) WriteLine("Button 3 clicked!"); EndTreenode("Some buttons!");}
if (StartTreenode("Some more buttons!")){ if (Button("Button 4!")) WriteLine("Button 4 clicked!"); if (Button("Button 5!")) WriteLine("Button 5 clicked!");
if (StartTreenode("Buttons in buttons!!")) { if (Button("Button 6!")) WriteLine("Button 6 clicked!"); EndTreenode("Buttons in buttons!!"); } EndTreenode("Some more buttons!");}if (SplashKit.StartTreenode("Some buttons!")){ if (SplashKit.Button("Button 1!")) SplashKit.WriteLine("Button 1 clicked!"); if (SplashKit.Button("Button 2!")) SplashKit.WriteLine("Button 2 clicked!"); if (SplashKit.Button("Button 3!")) SplashKit.WriteLine("Button 3 clicked!"); SplashKit.EndTreenode("Some buttons!");}
if (SplashKit.StartTreenode("Some more buttons!")){ if (SplashKit.Button("Button 4!")) SplashKit.WriteLine("Button 4 clicked!"); if (SplashKit.Button("Button 5!")) SplashKit.WriteLine("Button 5 clicked!");
if (SplashKit.StartTreenode("Buttons in buttons!!")) { if (SplashKit.Button("Button 6!")) SplashKit.WriteLine("Button 6 clicked!"); SplashKit.EndTreenode("Buttons in buttons!!"); } SplashKit.EndTreenode("Some more buttons!");}if start_treenode("Some buttons!"): if (button("Button 1!")): write_line("Button 1 clicked!") if (button("Button 2!")): write_line("Button 2 clicked!") if (button("Button 3!")): write_line("Button 3 clicked!") end_treenode("Some buttons!")
if start_treenode("Some more buttons!"): if (button("Button 4!")): write_line("Button 4 clicked!") if (button("Button 5!")): write_line("Button 5 clicked!")
if start_treenode("Buttons in buttons!!"): if (button("Button 6!")): write_line("Button 6 clicked!") end_treenode("Buttons in buttons!!") end_treenode("Some more buttons!")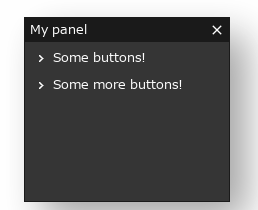
Part 4: Advanced layouts (Reference)
Section titled “Part 4: Advanced layouts (Reference)”Rows/Columns
Section titled “Rows/Columns”The elements placed in panels are automatically placed in rows - by default one element per row. We can create columns ourselves, allowing us to group our elements together on single rows!
To start, we need to call Start Custom Layout - this removes the default layouting. Now we can use the following functions to adjust how many elements we can place on the row:
Finally, to return to the default layout, just call Reset Layout.
You can also adjust the height of a row, using Set Layout Height.
Here’s an example, where we create six buttons - three on each row, with the top row being taller.
start_custom_layout();split_into_columns(3);set_layout_height(64);
if (button("Button 1!"))    write_line("Button 1 clicked!");if (button("Button 2!"))    write_line("Button 2 clicked!");if (button("Button 3!"))    write_line("Button 3 clicked!");
set_layout_height(0); // 0 resets to default
if (button("Button 4!"))    write_line("Button 4 clicked!");if (button("Button 5!"))    write_line("Button 5 clicked!");if (button("Button 6!"))    write_line("Button 6 clicked!");
reset_layout();StartCustomLayout();SplitIntoColumns(3);SetLayoutHeight(64);
if (Button("Button 1!")) WriteLine("Button 1 clicked!");if (Button("Button 2!")) WriteLine("Button 2 clicked!");if (Button("Button 3!")) WriteLine("Button 3 clicked!");
SetLayoutHeight(0); // 0 resets to default
if (Button("Button 4!")) WriteLine("Button 4 clicked!");if (Button("Button 5!")) WriteLine("Button 5 clicked!");if (Button("Button 6!")) WriteLine("Button 6 clicked!");
ResetLayout();SplashKit.StartCustomLayout();SplashKit.SplitIntoColumns(3);SplashKit.SetLayoutHeight(64);
if (SplashKit.Button("Button 1!")) SplashKit.WriteLine("Button 1 clicked!");if (SplashKit.Button("Button 2!")) SplashKit.WriteLine("Button 2 clicked!");if (SplashKit.Button("Button 3!")) SplashKit.WriteLine("Button 3 clicked!");
SplashKit.SetLayoutHeight(0); // 0 resets to default
if (SplashKit.Button("Button 4!")) SplashKit.WriteLine("Button 4 clicked!");if (SplashKit.Button("Button 5!")) SplashKit.WriteLine("Button 5 clicked!");if (SplashKit.Button("Button 6!")) SplashKit.WriteLine("Button 6 clicked!");
SplashKit.ResetLayout();start_custom_layout()split_into_columns(3)set_layout_height(64)
if (button("Button 1!")): write_line("Button 1 clicked!")if (button("Button 2!")): write_line("Button 2 clicked!")if (button("Button 3!")): write_line("Button 3 clicked!")
set_layout_height(0); # 0 resets to default
if (button("Button 4!")): write_line("Button 4 clicked!")if (button("Button 5!")): write_line("Button 5 clicked!")if (button("Button 6!")): write_line("Button 6 clicked!")
reset_layout()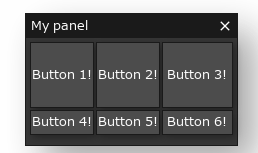
Entering Columns
Section titled “Entering Columns”A really powerful feature of columns, is that we can enter a column, and add elements to it directly without automatically moving to the next one. This allows us to create much more complex layouts.
To enter a column, simple use Enter Column - now elements will be placed inside the current column.
Once you’re done, you can leave it with Leave Column.
Here’s an example:
start_custom_layout();split_into_columns(2);
enter_column();set_layout_height(64);
if (button("Button 1!"))    write_line("Button 1 clicked!");if (button("Button 2!"))    write_line("Button 2 clicked!");
leave_column();
enter_column();set_layout_height(0); // 0 resets to default
if (button("Button 4!"))    write_line("Button 4 clicked!");if (button("Button 5!"))    write_line("Button 5 clicked!");if (button("Button 6!"))    write_line("Button 6 clicked!");
leave_column();
reset_layout();StartCustomLayout();SplitIntoColumns(2);
EnterColumn();SetLayoutHeight(64);
if (Button("Button 1!")) WriteLine("Button 1 clicked!");if (Button("Button 2!")) WriteLine("Button 2 clicked!");
LeaveColumn();
EnterColumn();SetLayoutHeight(0); // 0 resets to default
if (Button("Button 4!")) WriteLine("Button 4 clicked!");if (Button("Button 5!")) WriteLine("Button 5 clicked!");if (Button("Button 6!")) WriteLine("Button 6 clicked!");
LeaveColumn();
ResetLayout();SplashKit.StartCustomLayout();SplashKit.SplitIntoColumns(2);
SplashKit.EnterColumn();SplashKit.SetLayoutHeight(64);
if (SplashKit.Button("Button 1!")) SplashKit.WriteLine("Button 1 clicked!");if (SplashKit.Button("Button 2!")) SplashKit.WriteLine("Button 2 clicked!");
SplashKit.LeaveColumn();
SplashKit.EnterColumn();SplashKit.SetLayoutHeight(0); // 0 resets to default
if (SplashKit.Button("Button 4!")) SplashKit.WriteLine("Button 4 clicked!");if (SplashKit.Button("Button 5!")) SplashKit.WriteLine("Button 5 clicked!");if (SplashKit.Button("Button 6!")) SplashKit.WriteLine("Button 6 clicked!");
SplashKit.LeaveColumn();
SplashKit.ResetLayout();start_custom_layout()split_into_columns(2)
enter_column()set_layout_height(64)
if (button("Button 1!")): write_line("Button 1 clicked!")if (button("Button 2!")): write_line("Button 2 clicked!")
leave_column()
enter_column()set_layout_height(0); # 0 resets to default
if (button("Button 4!")): write_line("Button 4 clicked!")if (button("Button 5!")): write_line("Button 5 clicked!")if (button("Button 6!")): write_line("Button 6 clicked!")
leave_column()
reset_layout()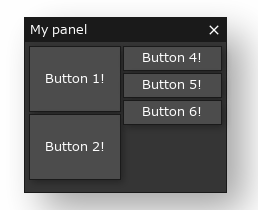
Take note how Button 1 and Button 2 are placed in the same column, rather than row now. This is really powerful - you can now split the column again, adjust heights, and so on, to lay things out exactly how you want.
Wrap up
Section titled “Wrap up”Hopefully you now understand how to use SplashKit’s layouting functionality! This can be a little tricky to understand, so as always make sure to play around with the code and try things out!
Good luck using it in your projects! In the next tutorial, we’ll see how we can style interfaces, to make them match our projects.