
Styling User Interfaces
This article will explain how we can style our SplashKit interfaces to match our projects. Written by Sean Boettger and others on October 2024
In this article we’ll see how we can customize the style of our interfaces, to make them match the visual design of our projects! We’ll cover using the style presets, how to customize individual colors, and other aspects like fonts and spacing.
Part 1: Colors and Shadows
Section titled “Part 1: Colors and Shadows”Using Preset Styles
Section titled “Using Preset Styles”SplashKit comes with a few preset styles that make it easy to start customizing the interface. To use them, just call Set Interface Style with the style you want - any elements created after this will use the new style! Here’s an example:
# include "splashkit.h"
int main(){    // open a window    open_window("My Interface!", 800, 600);
    // set the interface style    set_interface_style(SHADED_LIGHT_STYLE);
    while (!quit_requested())    {        process_events();
        clear_screen(COLOR_WHITE);
        button("My Button!", rectangle_from(300, 260, 200, 24));
        draw_interface();
        refresh_screen();    }
    // close all open windows    close_all_windows();
return 0;}using SplashKitSDK;using static SplashKitSDK.SplashKit;
// open a windowOpenWindow("My Interface!", 800, 600);
// set the interface styleSetInterfaceStyle(InterfaceStyle.ShadedLightStyle);
while (!QuitRequested()){ ProcessEvents();
ClearScreen(ColorWhite());
Button("My Button!", RectangleFrom(300, 260, 200, 24));
DrawInterface();
RefreshScreen();}
// close all open windowsCloseAllWindows();using SplashKitSDK;
namespace InterfaceStyling{ public class Program { public static void Main() { // open a window Window window = new Window("My Interface!", 800, 600);
// set the interface style SplashKit.SetInterfaceStyle(InterfaceStyle.ShadedLightStyle);
while (!window.CloseRequested) { SplashKit.ProcessEvents();
window.Clear(Color.White);
SplashKit.Button("My Button!", SplashKit.RectangleFrom(300, 260, 200, 24));
SplashKit.DrawInterface();
window.Refresh(); }
// close all open windows SplashKit.CloseAllWindows(); } }}from splashkit import *
# open a windowopen_window("My Interface!", 800, 600)
# set the interface styleset_interface_style(InterfaceStyle.shaded_light_style)
while (not quit_requested()): process_events()
clear_screen_to_white()
button_at_position("My Button!", rectangle_from(300, 260, 200, 24))
draw_interface()
refresh_screen()
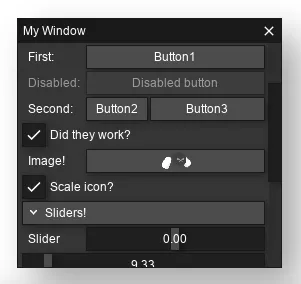
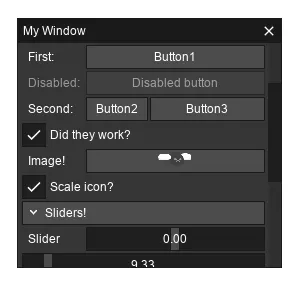
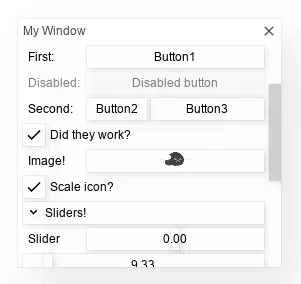
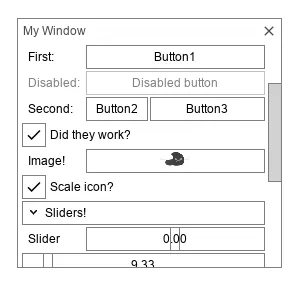
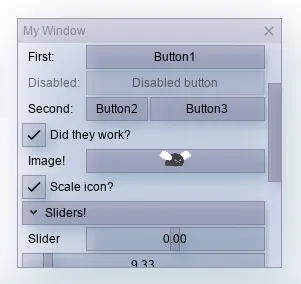
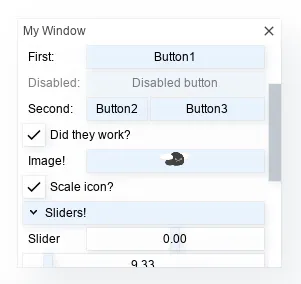
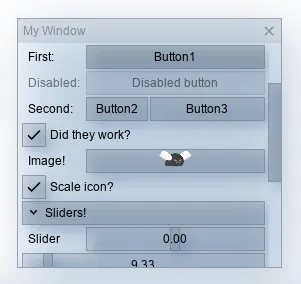
# close all open windowsclose_all_windows()You can choose from any of the styles in Interface Style. Here’s how they look with a more complex interface:
|
|
|
|
|
|
|
|
|
|
|
|

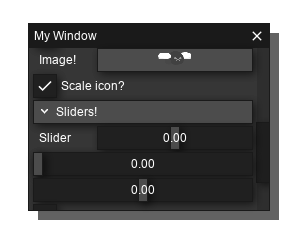
You can also customize a preset a little by providing an optional color that it can use -
for instance, set_interface_style(SHADED_DARK_STYLE , hsb_color(0.6, 0.4, 1.0)) (using light blue) provides the following results:
|
|
|

Custom Styles
Section titled “Custom Styles”You can also create your own unique look with the other interface style functions. The main two to try first are:
- Set Interface Colors Auto, sets the majority of the interface’s colors in one go
- Set Interface Shadows, changes the color of and how blurry shadows are (see below)
For text, there’s also:
- Set Interface Text Color, changes the color of text inside panels/elements
- Set Interface Root Text Color, changes the color of text on the main window
There are also a variety of other functions that allow you to set colors for specific things, like elements, panels, borders, etc. Using these gives you a lot more flexibility, but also more room to make not so great looking interfaces. If you want to try them out, you can find them all on the API!
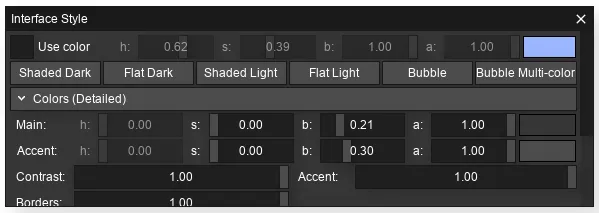
Style Panel
Section titled “Style Panel”As a utility for experimenting with different styles, SplashKit comes with an Interface Style Panel function. You can use this to create a panel that allows you to adjust the style - you can then note down the colors/settings you used, and set them yourself in code.
Part 2: Fonts
Section titled “Part 2: Fonts”By default, the interface will try and use a font available in your system. You can also set the font yourself, to customize how text appears!
- Set Interface Font, lets you change the current font, loaded with Load Font
- Set Interface Font Size, lets you change the current font size
font myFont = load_font("Custom Font", "arial.ttf");set_interface_font(myFont);set_interface_font_size(12);Font myFont = LoadFont("Custom Font", "arial.ttf");SetInterfaceFont(myFont);SetInterfaceFontSize(12);Font myFont = SplashKit.LoadFont("Custom Font", "arial.ttf");SplashKit.SetInterfaceFont(myFont);SplashKit.SetInterfaceFontSize(12);my_font = load_font("Custom Font", "arial.ttf")set_interface_font(my_font)set_interface_font_size(12)As mentioned in the previous section, you can also adjust the color of text with the following:
- Set Interface Text Color, changes the color of text inside panels/elements
- Set Interface Root Text Color, changes the color of text on the main window
Part 3: Labels and Spacing/Padding
Section titled “Part 3: Labels and Spacing/Padding”You can adjust the space given for labels with Set Interface Label Width - if your labels are being cut short, try increasing this from its default of 60!
You can also adjust the general spacing and padding in the interface using Set Interface Spacing.
Wrap up
Section titled “Wrap up”You now know how to style SplashKit’s interface to suit your project! For quick customization, Set Interface Style is a great function to start with.
If your project requires a more specific look, using the remaining functions will give you a lot of scope to adjust it. Good luck with using it in your projects!